How to Make Cold Brew Coffee at Home (Easy 24-Hour Recipe)


Cold brew is the most forgiving coffee method you'll ever try. No machine. No pressure. No heat. Just coarse coffee, cold water, and 24 hours of doing absolutely nothing.
Here's the whole method in one line: steep coarse-ground coffee in cold water at a 1:8 ratio for 24 hours, then strain twice. Making cold brew coffee at home is that simple — time is the extraction engine here. Not heat.
I'm Marco Delgado. I've burned hundreds of roasts and logged every single one. I care about data over intuition. And this recipe is the most data-backed simple thing in coffee. Let me walk you through it. ☕
TL;DR — Your 24-Hour Cold Brew At a Glance
Key takeaway: 1:8 coffee-to-water ratio. Coarse grind. 24-hour steep. Strain twice. That's the whole system.
No Toddy. No special brewer. A jar you already own.
Why Cold Water + Time Beats Heat Every Time
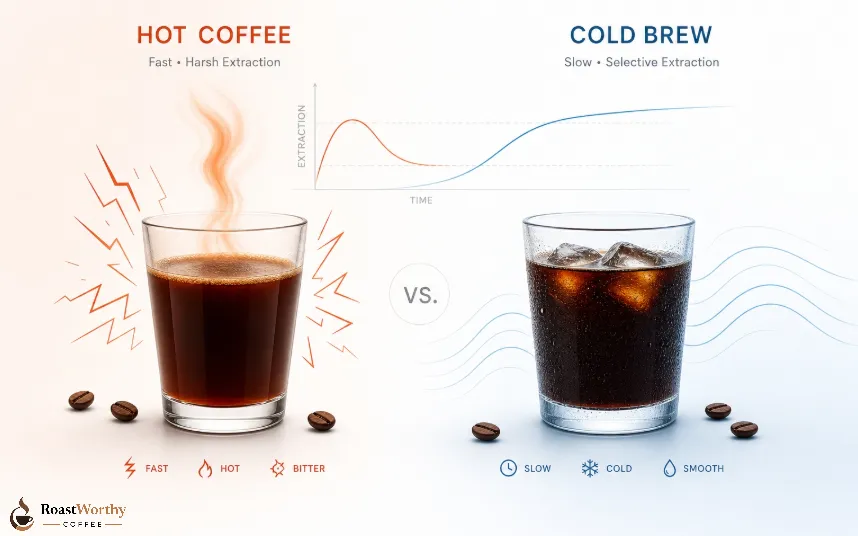
Here's what the water is actually doing.
Hot water extracts fast — acids, bitters, oils, all at once. That's why hot coffee can taste harsh if you're not precise. Cold water extracts slowly, selectively. It pulls the sweet, mellow compounds and leaves most of the harsh acids behind.
The result is a brew that's naturally lower in acidity and bitterness — not because of your technique, but because of chemistry.
That's also why cold brew tastes smoother even with mid-range beans. The slow extraction forgives a lot. The curve doesn't lie. ⚗️
The Gear You Already Own (No Special Equipment Needed)
You don't need to buy anything.
A French press works just as well. It brews and strains in the same vessel.
The grind is the single variable that wrecks most first batches. Get that right and the rest is nearly impossible to mess up.
Step-by-Step: The Exact 24-Hour Cold Brew Method
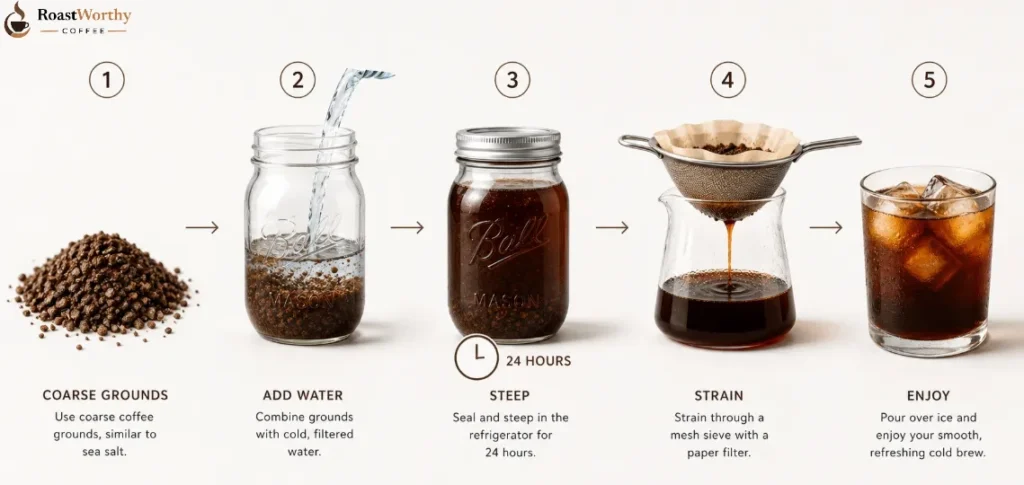
Step 1: Grind Coarse — Like Sea Salt, Not Sand
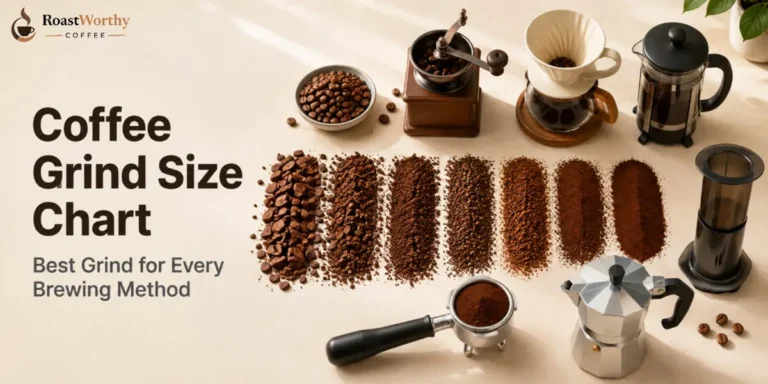
Your target grind looks like coarse sea salt. This isn't preference — it's extraction science.
Fine grinds have more surface area. In 24 hours of cold steeping, a fine grind over-extracts badly — bitter, muddy, gritty. Coarse grinds extract at the right pace for the time and temperature.
If you're buying pre-ground, ask specifically for cold brew or French press coarse. If you grind at home, go to your coarsest setting.
Step 2: Combine Coffee and Cold Water
Add 100g of coffee to your mason jar. Pour in 800ml of cold water.
Stir gently until every ground is wet. Some grounds will float to the surface — that's normal. Push them down.
Don't skip the stir. Dry grounds sitting above the waterline won't extract. You want full saturation from the start.
Step 3: Steep 24 Hours — Then Leave It Alone
Cap the jar. Set it in the fridge or leave it on the counter.
Both work. The fridge is more consistent and forgiving, especially in warmer climates.
Do not touch it. Let the time do the work. Your first roast — er, brew — will be imperfect. Make it anyway.
Step 4: Strain Twice — Don't Skip the Second Pass
After 24 hours, pour through your fine-mesh strainer into a clean vessel. This catches the grounds.
Then — and this matters — pour through a paper coffee filter or cheesecloth a second time. This catches the fine particles the mesh missed.
The second strain is what separates smooth cold brew from gritty cold brew. It adds two minutes. Don't skip it.
Step 5: Serve Over Ice and Adjust
Pour over ice. If you brewed at 1:8, it's ready to drink as-is. Add milk, oat milk, or cream to taste.
Store the rest in a sealed jar in the fridge. Keeps clean for up to two weeks.
Cold Brew Ratios — Exact Numbers, No Guessing
The ratio decides whether you get something great or something you pour down the sink.
There are two approaches: ready-to-drink and concentrate. Concentrate is more efficient — stronger per gram of coffee, smaller storage volume, more flexible per cup.
| Style | Coffee : Water | Taste Profile | How to Serve |
|---|---|---|---|
| Ready-to-drink | 1:8 | Smooth, mellow | Straight over ice |
| Light concentrate | 1:5 | Richer, more body | Dilute 1:1 with water or milk |
| Strong concentrate | 1:4 | Intense, punchy | Dilute 1:2 or 1:3 |
Start at 1:8 for your first batch. It's the most forgiving ratio. Once you know your palate, adjust toward concentrate if you want something more versatile.
One important note: weigh your coffee in grams, not scoops. Coffee is roughly half the density of water, so volume measurements throw the ratio off significantly. A cheap kitchen scale fixes this in every batch.
Cold Brew vs Iced Coffee — Two Completely Different Drinks
This distinction matters more than most people realise.
Iced coffee is hot-brewed coffee poured over ice. Brewed in minutes. Brighter, more acidic, more variable. Great if you need coffee fast.
Cold brew is never heated at any point. The absence of heat changes the entire chemical extraction — lower acidity, higher sweetness, smoother finish.
| Cold Brew | Iced Coffee | |
|---|---|---|
| Brew method | Cold steep, 12–24 hrs | Hot brewed, then chilled |
| Time required | 12–24 hours | 5 minutes |
| Acidity level | Low — naturally smooth | Higher — bright and sharp |
| Typical caffeine | Higher (especially concentrate) | Standard brew levels |
| Flavour character | Sweet, mellow, chocolatey | Crisp, acidic, fruity-bright |
The heat is the dividing line. No heat extraction means no harsh chlorogenic acids. That's the science behind why it tastes different — not just marketing language.
Taste it. Write it down. Compare them back to back. The difference is immediately obvious in the cup.
The 5 Variables That Separate Good Cold Brew from Great Cold Brew
Most bad batches trace back to one of these. Fix them in sequence.
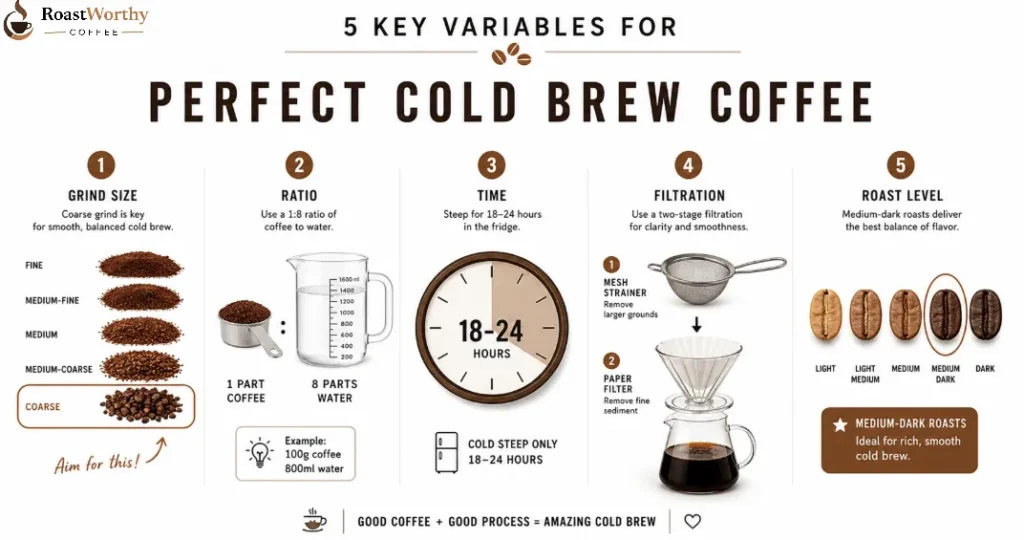
The grind is the variable that matters most. Get that right and you've solved 80% of the problem before you've steeped a single gram.
How to Actually Drink It — 4 Build Recipes
The base brew is just the starting point.
Concentrate is the move for all of these. Ready-to-drink batches get watered down. Concentrate gives you control over every cup. ☕
FAQs Related to Cold Brew Coffee
What is the best ratio for cold brew coffee at home?
1:8 coffee to water for ready-to-drink cold brew. For concentrate, use 1:5 and dilute 1:1 before serving. Always measure by weight for consistency.
How long should I steep cold brew for the best flavour?
24 hours is the sweet spot for most home brewers. The safe window is 18–24 hours. Going past 24 hours adds bitterness without adding strength.
Why does my homemade cold brew taste bitter?
Almost always the grind. A grind that's too fine over-extracts over a long steep time. Go coarser before changing anything else. Over-steeping past 24 hours is the second culprit.
Can I make cold brew in a mason jar?
Yes — a mason jar is all you need. Add coffee and cold water, steep 24 hours, strain through a mesh and then a paper filter. No special equipment required.
Is cold brew stronger than regular iced coffee?
Usually yes. Cold brew concentrate especially has significantly more caffeine than standard hot-brewed iced coffee, and the smooth, low-acid taste makes it easy to underestimate how much caffeine you're getting.
How long does homemade cold brew last in the fridge?
Concentrate keeps well for up to two weeks in a sealed jar. Ready-to-drink cold brew is best within 7–10 days before the flavour starts to flatten.
Make the First Batch Tonight
The setup takes five minutes. The brew runs overnight. Tomorrow morning you have two weeks of cold brew in the fridge.
Coarse grind. 1:8 ratio. 24 hours. Strain twice. That's the entire system.
Your first batch will be good. Your third will be dialled in. Start tonight.
More Recommendations from RoastWorthy Coffee