
Espresso Channeling: What It Is, Why It Happens, and How to Fix It

Espresso channeling is the reason your shot tastes sour, bitter, or just… broken — even when your dose looks right, your grind is dialed, and you did everything you thought you were supposed to do.
It's the most common problem in home espresso. And it's almost entirely fixable.
Here's what's actually happening inside that portafilter. 🔥
What Is Espresso Channeling?
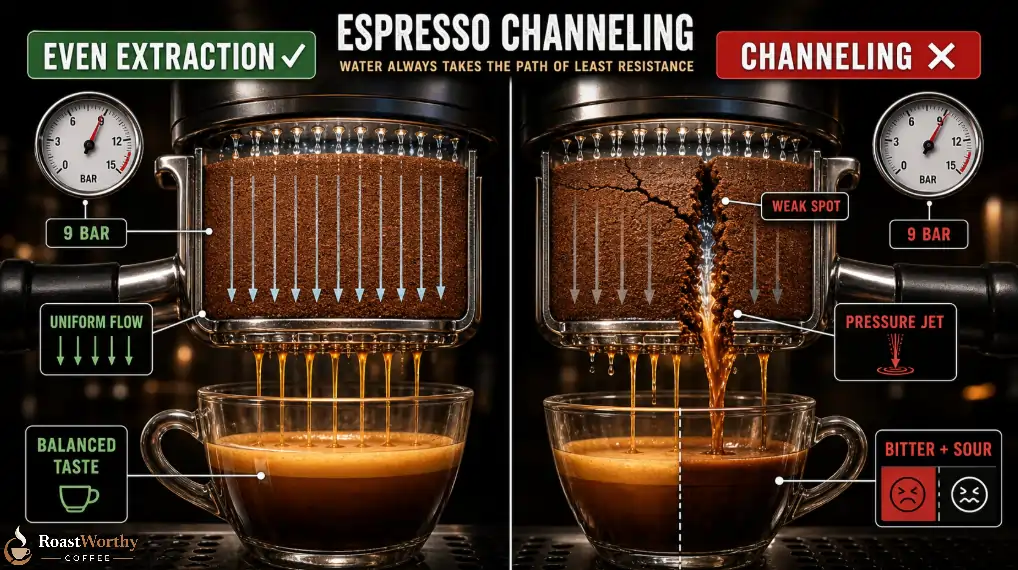
When you pull a shot, pressurized water — 9 bars of it — pushes through your coffee puck. Ideally, it moves through every millimeter of that puck evenly, extracting at the same rate across the entire bed.
Channeling is what happens when that water finds a weak spot and blasts through it instead of spreading evenly.
That weak spot — a crack, an air pocket, a gap near the basket wall — gets over-extracted in seconds. The rest of the puck barely gets touched. You end up with uneven extraction: bitter and sour, coexisting in the same 36ml shot.
You're not tasting a bad recipe. You're tasting pressure physics doing exactly what pressure physics does. ⚗️
The frustrating part is that channeling can happen even when your shot looks normal from the outside. A spouted portafilter hides it. Your taste buds catch it later.
Why Espresso Channeling Happens
There isn't one cause. There are at least six, and most home baristas are dealing with two or three simultaneously without knowing it.
Uneven Puck Distribution
Grind doesn't fall evenly into the basket. It piles in the center, domes toward one side, or mounds unevenly depending on your grinder's chute angle.
If you tamp that uneven surface without distributing first, the tamper compresses the high spots harder than the low spots. Low spots stay loose. Water finds the loose zones within the first two seconds.
That's your channel. It was built in before the shot even started.
Poor Tamping Technique
Tamping at an angle — even 2 to 3 degrees — creates a puck that's thicker on one side and compressed less on the other.
At 9 bars, water always takes the path of least resistance. It doesn't average things out. It exploits the difference immediately.
Consistent angle matters more than consistent pressure. A level 15kg tamp beats a tilted 30kg tamp every single time.
Clumped or Static-Charged Grounds
Static causes coffee grounds to clump and stick together before they land in the basket. Clumps contain air pockets. Even if you distribute and tamp perfectly, those internal voids become channels the moment water pressure hits the puck.
This is the channeling cause most people overlook completely. It happens at the grinder — before you've even touched the portafilter.
Single-dose grinders and lower-humidity environments are especially prone to this. The Ross Droplet Technique (RDT) — adding 2–3 drops of water to whole beans before grinding — dramatically reduces static and clumping for under zero extra cost.
Puck Defects After Tamping
Pulling the tamper up too quickly creates a brief vacuum that can fracture the puck surface. So can tapping the side of the portafilter to knock down loose grounds after tamping.
A hairline crack on the puck surface is invisible to the naked eye. At 9 bars, it's a direct highway for water to bypass 60% of your coffee bed.
Always lift the tamper slowly and vertically. Never knock the portafilter after the tamp.
Under-Dosed or Mismatched Basket
Running 15g of coffee in a 20g basket leaves the puck sitting too low and too loose. Water finds gaps around the basket edges and along the puck walls before it ever pushes through the coffee itself.
Overdosing creates its own problems — channeling from overpressure cracks — but under-dosing is the faster path to a broken shot.
Dirty Equipment
A clogged shower screen distributes water unevenly across the puck surface. Old coffee oils and residue inside the basket or group gasket change how water flows in subtle but consistent ways.
Clean your shower screen weekly. Backflush your machine regularly. Equipment issues create channeling patterns that no amount of puck prep will fix. ☕
How to Detect Channeling Before It's Too Late
With a Bottomless (Naked) Portafilter
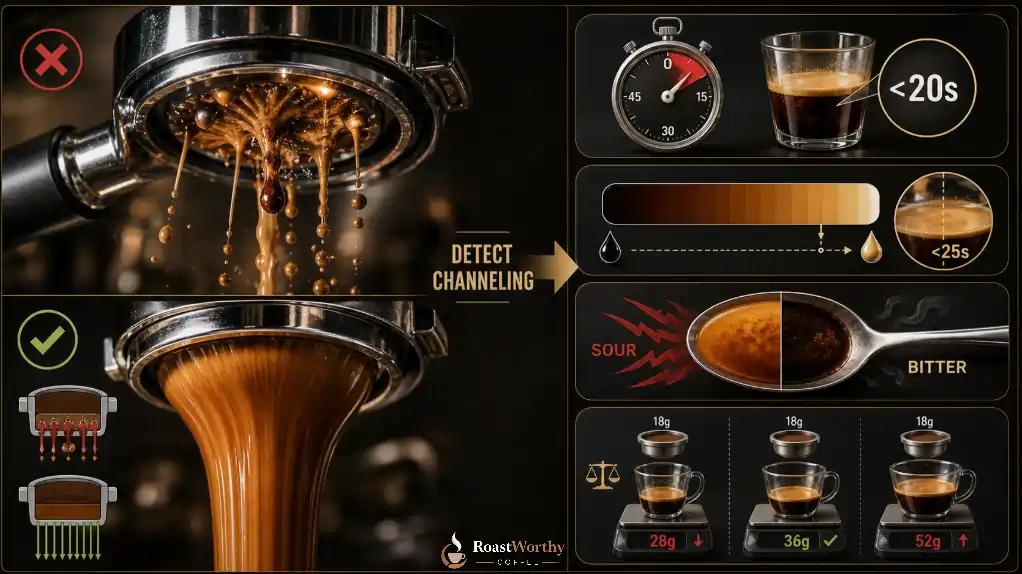
This is the gold-standard channeling detector. A naked portafilter removes the spouts and exposes the basket bottom — so you see exactly where espresso is exiting.
Signs of channeling:
A good shot from a bottomless portafilter looks like a single, slow-blooming curtain emerging evenly from the entire basket.
Without a Bottomless Portafilter
Channeling is harder to diagnose but still readable through speed, color, and taste.
Your taste buds are the first and most reliable channeling detector you own. A well-extracted shot integrates — it tastes balanced, not at war with itself. 🔥
How to Fix Espresso Channeling: The Full Puck Prep Sequence
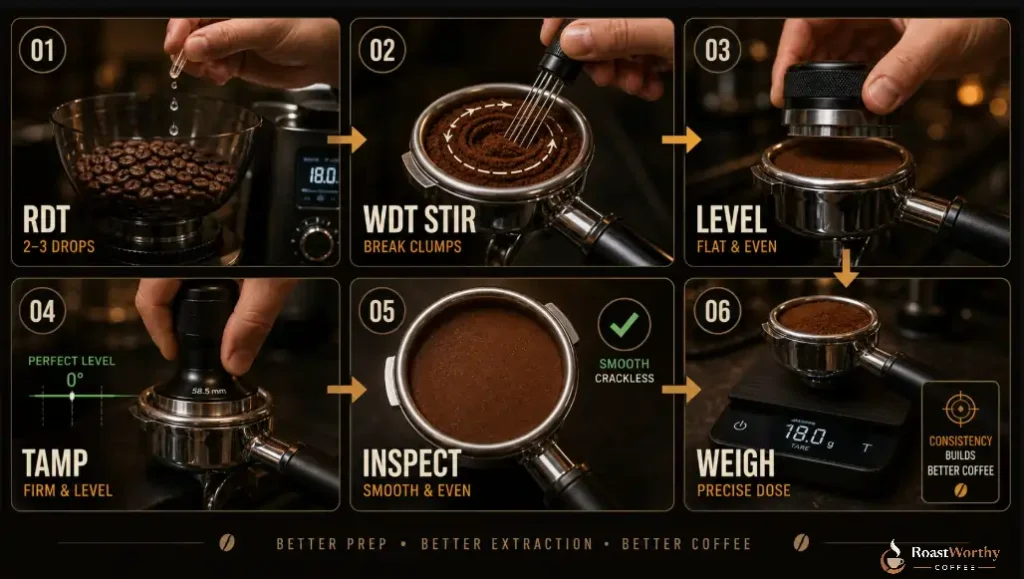
Fix the cause. Not the symptom. Here's the sequence that works — in order.
- Step 1: Apply RDT Before Grinding
Add 2–3 drops of water to your whole beans immediately before grinding. This is the Ross Droplet Technique.
It neutralizes static electricity inside the grinder. Grounds clump less, distribute more evenly, and fall into the basket with far better consistency. It costs nothing and takes three seconds.
Do this every single dose.
- Step 2: Use a WDT Tool After Grinding
WDT (Weiss Distribution Technique) is the single highest-impact puck prep fix for channeling.
After grinding into your portafilter, insert a WDT tool — a handle fitted with 0.3–0.4mm stainless steel needles — and stir through the grounds in wide, slow circular motions from center to edge. Go all the way to the basket bottom.
This breaks clumps, redistributes grounds, and eliminates the internal air pockets that grinding creates.
It takes 10 seconds. The difference in shot quality is immediate and consistent.
You don't need to spend $60 on a WDT tool. Three acupuncture needles pressed into a wine cork do the same job. I started with that exact setup. It works.
- Step 3: Level the Puck Surface Before Tamping
After WDT, the grounds should look relatively flat. If they don't, level them.
Use a distribution tool (OCD-style) or the stockfleth move — tilt your portafilter at 45 degrees, place your finger flat across the top of the grounds, and rotate. The goal is a uniformly flat, even surface before your tamper makes any contact.
Tamping an uneven surface guarantees an uneven puck. Leveling costs nothing and eliminates that variable entirely.
- Step 4: Tamp Level — With Intention
Apply consistent, level pressure. Around 15–20kg is enough. You don't need to crush the puck.
What you need is angle. Perfectly level. Every time.
Use a self-leveling or calibrated tamper if your angle is inconsistent. Normcore, Pesado, and Pullman all make affordable versions in the $30–$80 range. They remove the human error variable from tamping geometry without requiring perfect form every shot.
Polish with one light rotation at the end. That's it.
- Step 5: Inspect the Puck and Lift Carefully
Lift the tamper straight up. Slow and deliberate. No yanking, no aggressive rotation.
Look at the puck surface: it should be smooth, matte, and crackless. If you see cracks or a rough surface, something went wrong upstream — clumps, uneven distribution, a wet basket, or too aggressive a tamp polish. Don't pull the shot. Re-dose.
A cracked puck will channel. No amount of machine quality saves you from a broken puck. ⚗️
- Step 6: Match Dose to Basket Size
Weigh every dose. Not approximately — precisely.
Running 2–3g below your basket's rated capacity is one of the fastest ways to introduce edge-channeling. The puck sits too low, leaves too much headspace, and water finds the basket walls before it finds the coffee.
The Puck Prep Checklist
Run this every shot until it's automatic:
That's the whole system. No mystery. Just consistent mechanics.
Tools That Fix Channeling (With Real Price Ranges)
You don't need $500 of gear to stop channeling. The highest-ROI tools are cheap.
| Tool | What It Solves | Price Range |
|---|---|---|
| WDT Tool | Clumping, uneven distribution, air pockets | $5 DIY – $60 |
| Calibrated / Self-Leveling Tamper | Tamping angle error | $30 – $150 |
| OCD-Style Distribution Tool | Puck surface leveling | $20 – $80 |
| Bottomless Portafilter | Channeling diagnosis and visualization | $20 – $60 |
| Precision Dose Scale (0.1g) | Dose consistency, basket matching | $15 – $50 |
| Puck Screen | Water impact on puck surface, edge channeling | $10 – $40 |
Start with the WDT tool and a scale. That combination fixes the majority of channeling problems for under $30.
Does Grinder Quality Directly Affect Channeling?
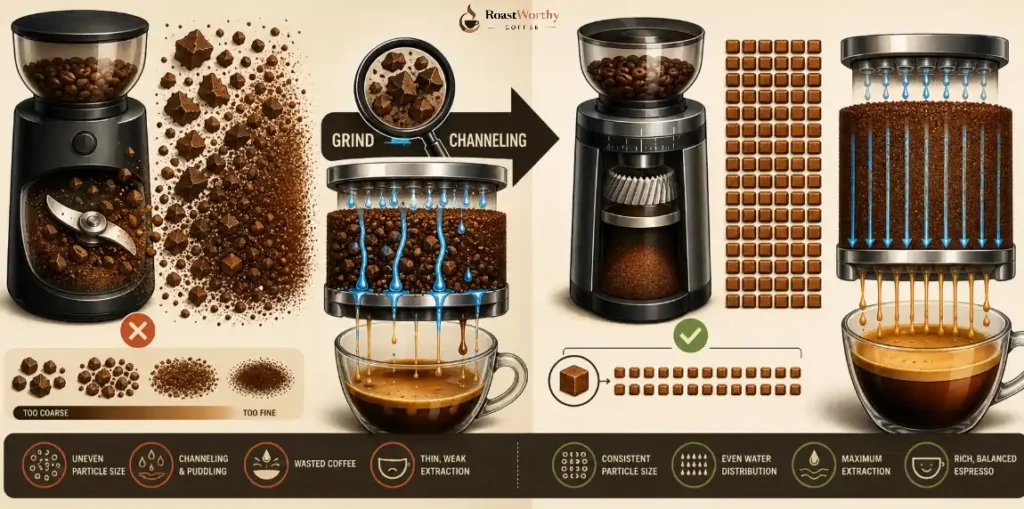
Yes. Significantly. And it's upstream of everything else.
Entry-level grinders — especially blade grinders and low-quality burr grinders — produce inconsistent particle sizes and excessive fines. Fines migrate to the puck's bottom layer during extraction and create a dense, over-extracted mat. Coarser particles above it under-extract. The result is structural channeling that happens because the puck itself is inconsistent.
A better grinder reduces channeling before puck prep even begins.
This doesn't mean you need a $1,000 flat burr grinder to pull a decent shot. WDT and RDT compensate significantly for mid-range grinder inconsistency. But if you're on a blade grinder, no amount of technique fully compensates for particle chaos.
The grind is upstream of everything. The curve doesn't lie. 🔥
Advanced Fix: Pre-Infusion
Pre-infusion saturates the puck at low pressure — typically 1–4 bars — for 5–10 seconds before ramping to full 9-bar extraction.
Why it matters: a completely dry puck is structurally fragile. When 9 bars of water hits a dry puck instantly, it can create micro-fractures in the first half-second. Those fractures are channels.
Pre-infusion lets grounds absorb water, swell slightly, and seal those vulnerable gaps before full extraction pressure hits. It doesn't eliminate channeling on its own — but it meaningfully reduces the risk, especially on lighter roasts where puck density is lower.
Machines with pre-infusion capability:
If your machine has pre-infusion: use it. Set 5–8 seconds to start, adjust from there. If it doesn't: your tamping technique and WDT routine matter even more.
FAQ: Espresso Channeling
What exactly is espresso channeling?
Channeling is when pressurized water finds a weak path through the coffee puck and blasts through it instead of flowing evenly across the entire bed. The result is simultaneous over-extraction in that channel and under-extraction everywhere else — producing a shot that tastes both sour and bitter.
What causes espresso channeling most commonly?
Uneven puck distribution, clumped grounds, and angled tamping are the three most common causes. Most home baristas are dealing with all three at once without realizing it.
How do I fix espresso channeling at home?
Use the RDT before grinding, WDT tool after grinding, level the puck surface before tamping, and tamp consistently level. Match your dose to your basket size. Those five steps eliminate the majority of channeling for most home setups.
Does the WDT tool actually stop channeling?
Yes — it's one of the most effective single fixes available. It breaks up ground clumps and creates a uniform puck density that resists channeling under pressure. It works whether you spend $5 on a DIY version or $60 on a machined tool.
Can I diagnose channeling without a bottomless portafilter?
Yes. Watch for shots that run too fast, blond early, or produce inconsistent yields. The clearest diagnostic is taste: a channeled shot is simultaneously sour and bitter and doesn't integrate on the palate.
Does pre-infusion prevent channeling?
It reduces the risk significantly. Pre-infusion saturates the dry puck at low pressure before full extraction begins, allowing grounds to swell and seal micro-fractures before 9 bars hits. It's not a substitute for good puck prep, but it's a meaningful layer of protection on top of it.
Good puck prep is just engineering. Every variable is controllable. Dial them in one at a time, write down what changes, and pull it again. Your first consistently clean shot will make the process obvious in retrospect.
More Recommendations from RoastWorthy Coffee