
How to Be a Better Home Barista: 12 Skills to Master


Becoming a Better Home Barista has almost nothing to do with your machine. It's about controlling variables — and most people control none of them.
Here's the honest version. The people pulling great shots at home aren't gifted. They're consistent. They weigh, they log, they fix one thing at a time.
These 12 skills are the difference between a decent cup and a genuinely good one. Work through them in order. Each one builds on the last.
Let's get into it.
☕ Key Takeaways
The single fastest way to a Better Home Barista cup: upgrade your grinder and fix your water — before you touch the machine.
Everything else is reps. Control one variable at a time, taste, adjust. Café-grade coffee at home is a process, not a purchase.
Quick Answer: How Do You Become a Better Home Barista?
You become a Better Home Barista by mastering twelve repeatable skills: weighing your coffee, fixing your water quality, getting grind consistency, using fresh beans, locking a brew ratio, prepping the puck, tamping level, steaming silky milk, controlling temperature, pouring evenly, diagnosing flavor, and logging results.
Most beginners skip straight to latte art and fancy machines. The real gains come from controlling variables. That's the whole secret… and it's free.
Skill 1: Weigh Everything (Yes, Everything) ⚗️
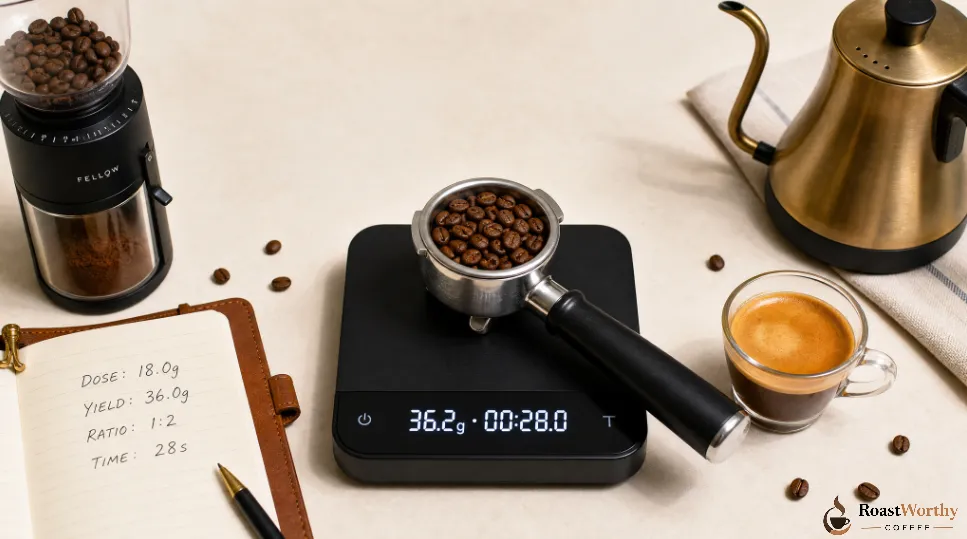
A scale is the single most important tool you own. More than the machine. More than the grinder.
Here's what weighing actually does. It kills the guesswork. You stop eyeballing a scoop and start hitting the same dose every single time.
Weigh three things:
For espresso you want a scale with 0.1g resolution and a built-in timer. It's non-negotiable.
Without weighing, you can't repeat a good shot… and you can't fix a bad one. That's why this skill comes first.
Taste it. Write it down. Brew it again.
Skill 2: Fix Your Water Before Anything Else ⚗️
Coffee is roughly 98% water. Bad water caps your ceiling no matter how good your beans are. This is the variable almost everyone ignores.
Here's what the minerals are actually doing. They grab flavor compounds during extraction. Too few and the cup tastes thin and sour. Too many and it goes flat, dull, muddy.
The numbers that matter:
| Brew method | Target TDS (ppm) |
|---|---|
| Filter / pour-over | 75–150 |
| Espresso | 70–150 |
| Industry “balanced” sweet spot | ~150 |
Water under about 75 ppm tends to under-extract. Push past 250 ppm and it turns harsh — plus it scales up your machine.
Distilled water remineralised with a coffee water packet or a DIY recipe beats hard tap water every single time. If your tap runs hard, this one fix does more than a new grinder would.
Skill 3: Get Grind Consistency Right ⚗️
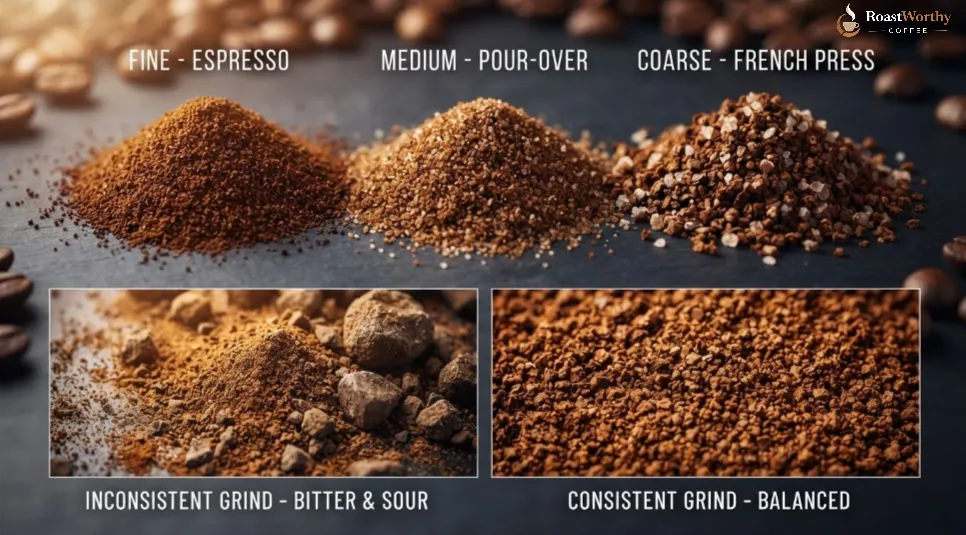
Your grinder matters more than your espresso machine. I'll say it louder for the people in the back.
Here's the science. Even particle size means even extraction. A cheap blade grinder makes dust and boulders. The dust over-extracts and goes bitter. The boulders under-extract and go sour. Same shot, two problems.
A burr grinder fixes this. Burrs crush coffee to a uniform size you can control.
What grind consistency looks like in practice:
Dial it by taste, not by guessing. Sour and bitter at once usually means an uneven grind — not the wrong dose.
The curve doesn't lie.
Skill 4: Respect Bean Freshness
Coffee off-gasses CO₂ for days after roasting. Brew too early and the gas disrupts your pour. Brew too late and it tastes of cardboard and stale nuts.
The freshness window:
Buy whole bean and grind to order. Pre-ground coffee loses its aromatics within minutes. Store it airtight, away from light and heat. Not the freezer door.
A fresh, well-stored bag beats an expensive one that's been open for a month. It's the cheapest upgrade you'll make to improve coffee at home.
Skill 5: Lock In Your Brew Ratio
Ratio is the skeleton of every recipe. Get this and everything else is fine-tuning.
The starting points that genuinely work:
Want it stronger or weaker? Move within the ratio. Don't abandon it. A 1:2.5 espresso (18g → 45g) drinks lighter and sweeter. A 1:1.5 (18g → 27g) pulls thick and intense.
Pick a ratio, brew it five times, then change one thing at a time. That's what dialling in actually means.
Skill 6: Master Puck Prep — WDT and Distribution ⚗️
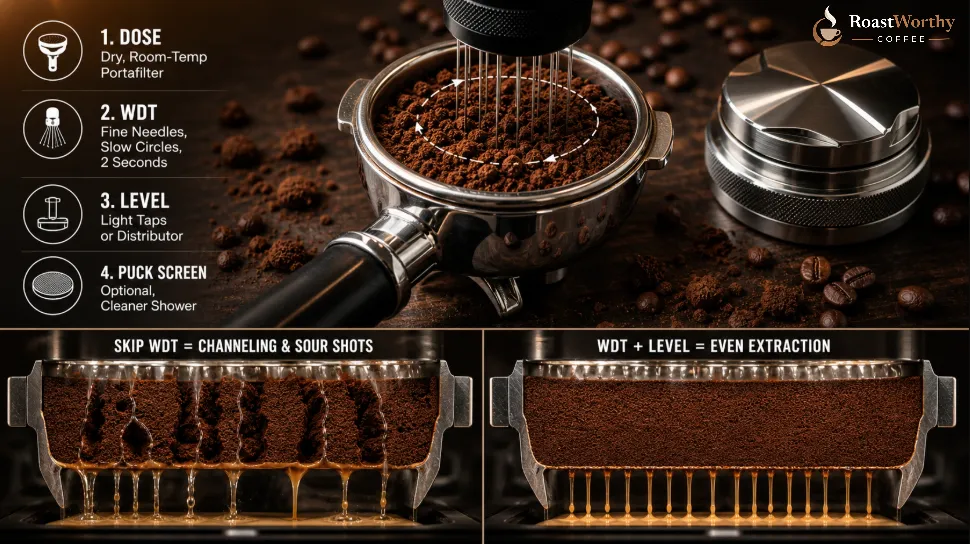
This is where most home espresso falls apart. Channeling. Water finds the easy path through your puck while the rest of the bed stays dry.
Here's the fix, in order:
- Dose into a dry, room-temperature portafilter.
- WDT — run fine needles in slow circles, bottom to top. Break every clump. Two seconds.
- Level — light taps or a gentle distributor to flatten the bed.
- Puck screen (optional) — keeps your shower screen cleaner over time.
You won't taste a scratch from a WDT tool. You will absolutely taste the channels from skipping it.
This single skill fixes more sour-and-bitter shots than anything else on this list. Your first WDT will feel fiddly. Do it anyway.
For more, see our guide on how to dial in espresso step by step.
Skill 7: Tamp Level, Not Hard
Most people obsess over tamp pressure. It barely matters.
Level matters. A tilted tamp sends water racing down the shallow side. That's channeling again — the same enemy from Skill 6.
The method:
Forget the “30 pounds of pressure” myth. It's noise. A level puck at moderate pressure beats a crooked puck slammed with force — every time.
Skill 8: Steam Silky, Glossy Milk ☕
Microfoam is the line between café milk and bubbly washing-up foam. It's not hard. It's just technique most people never learned.
The sequence:
- Fill the pitcher with cold milk to just below the spout.
- Pull your shot first, so it's ready.
- Purge the steam wand for a second.
- Tip just at the surface, slightly off-centre. Turn steam on.
- Stretch for ~15 seconds — you want a hiss like paper tearing.
- Drop the tip just under the surface. Let the milk spin into a vortex to fold the bubbles in.
- Cut steam at 140–150°F — when the pitcher is too hot to hold.
Then wipe and purge the wand. Every single time, or it crusts up.
Glossy, paint-like milk pours itself into latte art. Bubbly milk never will.
Skill 9: Control Your Brew Temperature ⚗️
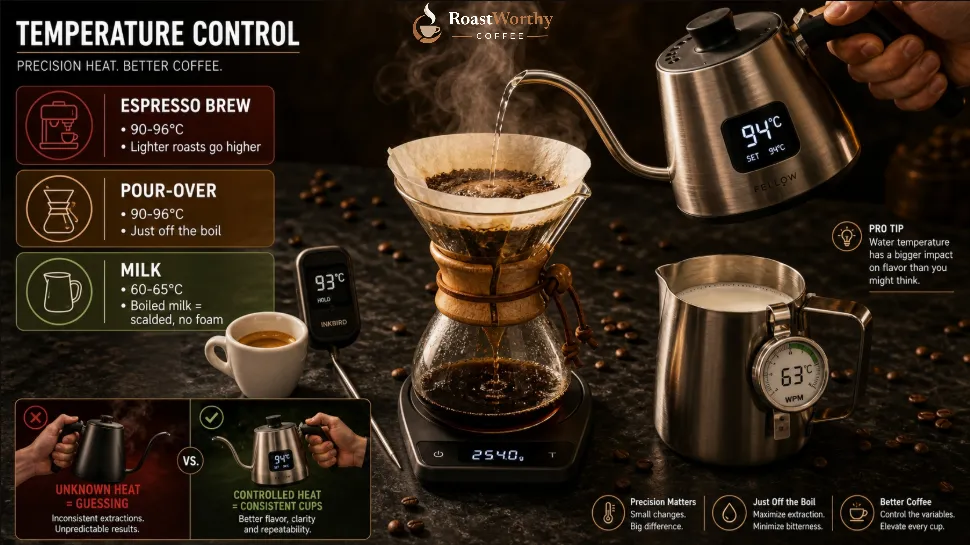
Here's what the heat is actually doing. Hotter water extracts faster and drags out more bitterness. Cooler water leans sour and bright.
Targets to hit:
Most home machines run hotter than the dial claims. A cheap thermometer or a temperature-controlled kettle is worth more than any gimmick gadget. Heat is a variable. Control it like one.
Skill 10: Pour With Intent
Start with the basics, not the latte art. On filter especially, the pour shapes your extraction.
For pour-over:
A clean, even pour lets origin character show up in the cup. A sloppy pour buries it.
Even saturation is the goal — every ground should see water for the same length of time. Win the extraction first. Latte art comes later.
Skill 11: Taste and Diagnose Like a Pro ☕
This is the skill that separates hobbyists from a true Better Home Barista. Reading the cup.
Forget menu-speak. Ask one blunt question: sour, balanced, or bitter?
The flavor diagnosis cheat-sheet:
| You taste | Likely cause | The fix |
|---|---|---|
| Sour, thin, sharp | Under-extracted | Grind finer, hotter water, longer time |
| Bitter, dry, hollow | Over-extracted | Grind coarser, cooler water, shorter time |
| Sour and bitter together | Channeling / uneven grind | Better puck prep, better grinder |
| Weak, watery | Ratio too high | Less water or more coffee |
| Flat, dull, lifeless | Stale beans or bad water | Fresh beans, fix your water |
Change one variable at a time. Change two and you learn nothing. Most cups are telling you exactly what's wrong. Learn to listen.
Skill 12: Log Every Brew — The Habit That Compounds
This is the boring skill. It's also the one that quietly makes you good.
Keep a brew log. A notes app on your phone works fine.
Record:
Memory is unreliable. You will not remember last Tuesday's grind setting. Your log turns a lucky good shot into a repeatable one — and it surfaces patterns you'd never spot otherwise.
Taste it. Write it down. Brew it again. That loop is the job.
The Gear That Actually Moves the Needle
You don't need all of it. But if you're upgrading, do it in this priority order.
| Priority | Gear | Why it matters | CTA |
|---|---|---|---|
| 1 | Burr grinder | Biggest single upgrade | Shop This Tool |
| 2 | 0.1g scale + timer | Makes espresso repeatable | Shop This Tool |
| 3 | WDT distribution tool | Kills channeling | Shop This Tool |
| 4 | Remineralisation packets | Fixes the invisible water problem | Shop This |
| 5 | Temp-control kettle | Precision for filter | Shop This Tool |
Honest take: spend on the grinder and water first. A modest machine with a great grinder beats a great machine with a bad one.
Frequently Asked Questions
What's the most important skill for a Better Home Barista?
Weighing everything. A scale makes your brewing repeatable, and repeatability is the foundation every other skill builds on.
What grind size should I use for espresso vs pour-over?
Espresso is fine, like caster sugar. Pour-over is medium, like table salt. French press is coarse, like sea salt.
What is the best water for brewing coffee at home?
Soft to moderately hard water around 75–150 ppm TDS. Distilled water remineralised with a coffee water recipe gives you the most control.
How long should I rest coffee beans after roasting?
Rest beans 7–14 days for espresso and 5–21 days for filter. Use them within 4–6 weeks of the roast date.
Why does my espresso taste sour and bitter at the same time?
That's channeling — water found an uneven path through the puck. Fix it with WDT, a level tamp, and a more consistent grinder.
Do I need an expensive machine to be a Better Home Barista?
No. Prioritise a quality burr grinder and good water. A modest machine paired with both beats a pricey machine with neither.
The Bottom Line: Variables, Not Gear
Being a Better Home Barista was never about the machine. It's about control.
You now have the twelve levers that actually move the cup. You don't fix all twelve at once. You fix one. Then you taste. Then you fix the next.
Start with the cheap wins this week: weigh your dose, sort your water, grind fresh. Those three alone will change your coffee in a single morning.
The rest is reps. Pull the shot. Read the cup. Adjust one thing.
Your first dialled-in cup might take a week. Some shots will still miss. Make them anyway — that's how the log fills up and the patterns appear.
The curve doesn't lie. Neither does the cup in front of you. Taste it. Write it down. Brew it again. ☕
More Recommendations from RoastWorthy Coffee